With Trimble Ag Software’s fleet management tools, you can see, use and share more precision data with your vehicle displays, and from third-party accounts. Start with our data compatibility chart and quick-start guides below to automatically or manually link your data to your online account and the mobile app, and send resource files to connected vehicle displays. Learn more in the full Fleet Management User Guide, including more help for FarmStream.
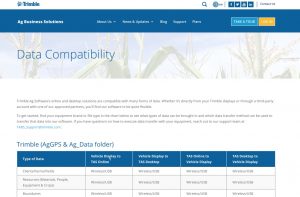
Trimble Ag Software can read in and export your precision ag data from a wide range of supported vehicle displays and third-party accounts. Check out our data compatibility and data transfer charts to see if your system and files are supported, or contact customer support for more help.
Trimble Ag Software Fleet Data Compatibility Chart
Learn more about FarmStream, an advanced productivity tool within Trimble Ag Software that can be turned on or off from the TMX-2050, GFX-750, GFX-350 or FmX display, in the Fleet User Guide.
Here are a few handy links to other Fleet documentation:
With just a few quick clicks online, organization administrators can add a vehicle and organize vehicle groups on your Trimble Ag Software account, with the option to add device serial numbers to wirelessly connect precision ag data to your account. Automatically import field, boundary and job data once your vehicle connection is established. Our software uses spatial selection to look for matches between your data and our software, starting with the field name. If field names are different, Trimble Ag Software looks for similar field boundaries to find a match.
Success tips
Before linking vehicle data to your account, check that field names are the same in both the display and on Trimble Ag Software. This prevents the creation of duplicate fields and ensures data is associated with the right location on your farm.
For tips on setting up your display so that data flows into the online account, refer to our FarmStream setup guide.
Getting set up
Log in to your Trimble Ag Software online account (learn more)
From the Fleet tab (top menu), select Vehicles (note: these are the same steps that can also be used from the Farm tab under Equipment)
Click on the Manage button (top right) and select New Vehicle
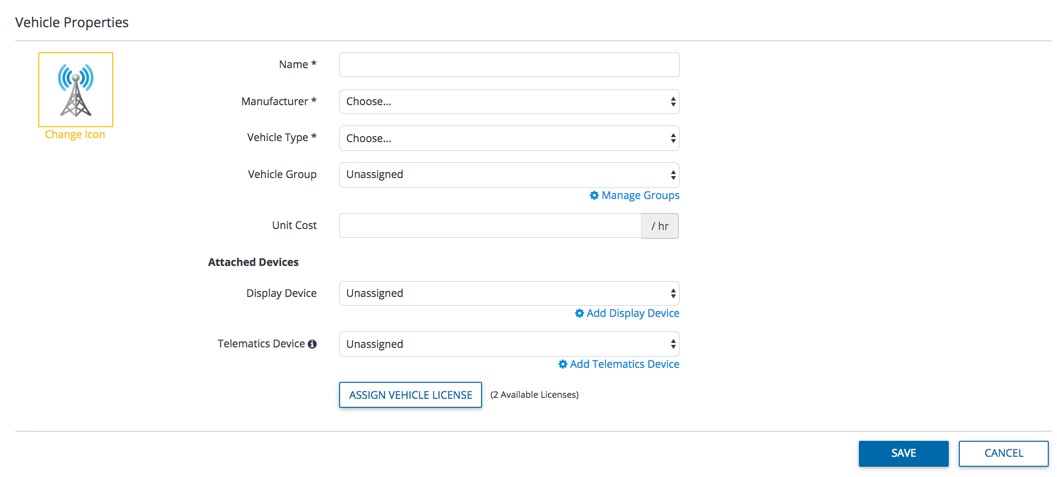
Complete the Vehicle Properties form, as shown below (required fields are displayed with an asterisk*):
Add a Name (required) for your vehicle
Select the Manufacturer (required) from the dropdown list
Select the Vehicle Type (required) from the dropdown list
Confirm the Vehicle Group by:
selecting Unassigned (default) from the list, or
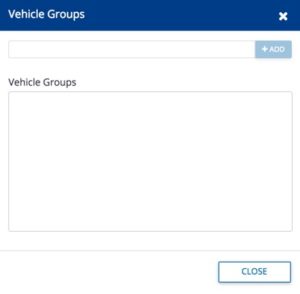
click the Manage Groups link to enter a custom group name to organize your fleet, click +Add, then click Close and select your new Vehicle Group from the dropdown list
Enter an hourly Unit Cost
Click the link (top left) to Change Icon and select an alternate thumbnail image for your vehicle from the choices provided
UnderAttached Devices on the Vehicle Properties form,the default is Unassigned (no connectivity). To add a device serial number* to share data wirelessly, you have two options when adding a device:
Click the link to Add Display Device link to enter the Device Serial Number, click Get Device Type to validate the serial number entered, then click Add, or
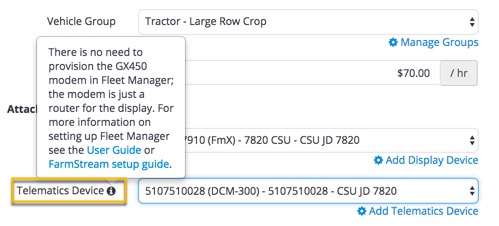
Click the link to Add Telematics Device (required only if you’re using the DCM-300 modem and your vehicle is not set up with a display configured for FarmStream**), then click the Add Display Device link to enter the Device Serial Number, click Get Device Type to validate the serial number, then click Add
Under AttachDevices on the Vehicle Properties form, click the Assign Vehicle License button to Assign an available vehicle license. Once assigned and saved, vehicle licenses cannot be moved to another vehicle. If needed, additional vehicle licenses can be purchased through your account in the online Marketplace.
Click Save when done (or Cancel)
*Devices cannot be added if already assigned to an organization on Trimble Ag Software.
**For tips on setting up your display so that data flows into the online account, refer to our FarmStream setup guide.
Get instant access to vehicle data in your third-party account(s) with Trimble Ag Software’s built in API connection. Our API (short for digital handshake) makes it easy for organization administrators to set up a wireless link with our partners, so that you have all of your farm’s precision data in one place. To learn more about data compatibility between Trimble Ag Software and other displays, file types and third-party accounts, click here.
Success tip: before linking vehicle data to your account, check that field names are the same in both the display and on Trimble Ag Software. This prevents the creation of duplicate fields and ensures data is associated with the right location on your farm.
Select Settings from the left navigation menu to modify the default options are checked (recommended) to:
On the Syncing tab, click the checkboxes to modify the sync options from the recommended default (shown above) to Automatically Add Operators entered on Field Displays and Automatically Add Vehicles entered on Field Displays
Click on the API Connections tab
Click +Add Account
Select an account from the list*: Raven Slingshot, AGCO Variodoc, JD Link, AFS Connect or PLM Connect (prior to connecting to Raven Slingshot, contact Raven to purchase an API key at a cost of approximately $100)
A new web page will open with the login page for your third-party account, where you can enter your credentials and sign in to your third-party account
Trimble Ag Software will display a message “Linking to your account”
When the API connection is complete, your third-party account will be listed on the API Connections tab and any associated vehicles and data can be viewed from your Trimble Ag Software account
* Contact our customer support team to see if APIs are available for other third-party accounts not listed here.
Get even more fleet management tools to improve operator efficiency analyze vehicle performance in the full Fleet Management User Guide.
When you prefer to simply manage or share machine data files directly with your Trimble Ag Software online account – without using our built-in wireless vehicle display connections – it’s easy to to manually upload files and resources.
Click the File Sync button to download and run our setup.exe file that uses our built-in API to automatically recognize and import supported data from your computer or USB device, or
Click the Upload Files button (or drag files here) to import files selected from your computer
As shown on the screen above, you can upload machine-collected data to your Trimble Ag Software online account from the following vehicle displays:
Trimble
CNH
AGCO
John Deere
Ag Leader
You can also upload data to share with your advisor, including:
Topo (topography)
EM/EC (electromagnetic/electroconductive)
Yield
Soil locations
Management zone boundaries
As well, you can deliver prescription maps and resource files to connected displays.
To learn more about data compatibility between Trimble Ag Software and other displays, file types and third-party accounts, click here.
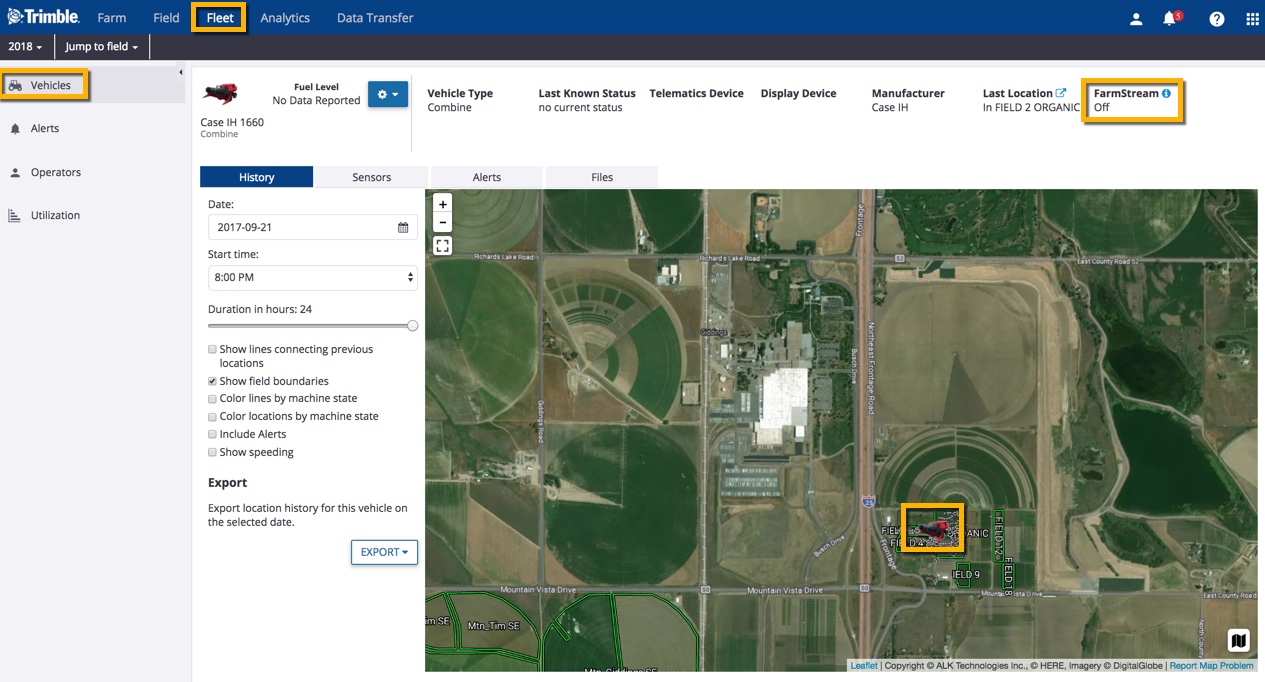
Once your vehicle is connected to your online account in Trimble Ag Software, you can view real-time status and location on the satellite map, edit properties and export location history.
Select Vehicles and click on a vehicle name from the Vehicle List
From the vehicle profile view (shown below):
use the satellite map to view by map type (Satellite or Road) and zoom in to the vehicle location
click on the tabs to view History, Sensors, Alerts and Files
check the status of FarmStream on the vehicle display, which controls whether data is being sent to Trimble Ag Software (learn more)
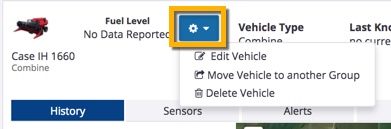
From the vehicle profile view above, click on the settingsicon next to the vehicle name to select the following dropdown menu options:
Edit vehicle properties
Move vehicle to another Group
Delete vehicle
Delete vehicle
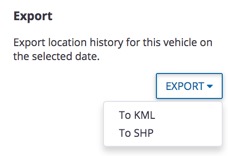
Click on the History tab and scroll down to click the Export button to share location history for this vehicle on the selected date, by selecting either KML or SHP file format:
When you’re no longer using a vehicle on the farm, it’s easy to delete the vehicle from your fleet records on Trimble Ag Software. Any vehicles that are deleted are simply retired, in case you want to unretire vehicles for use on your account at a later date.
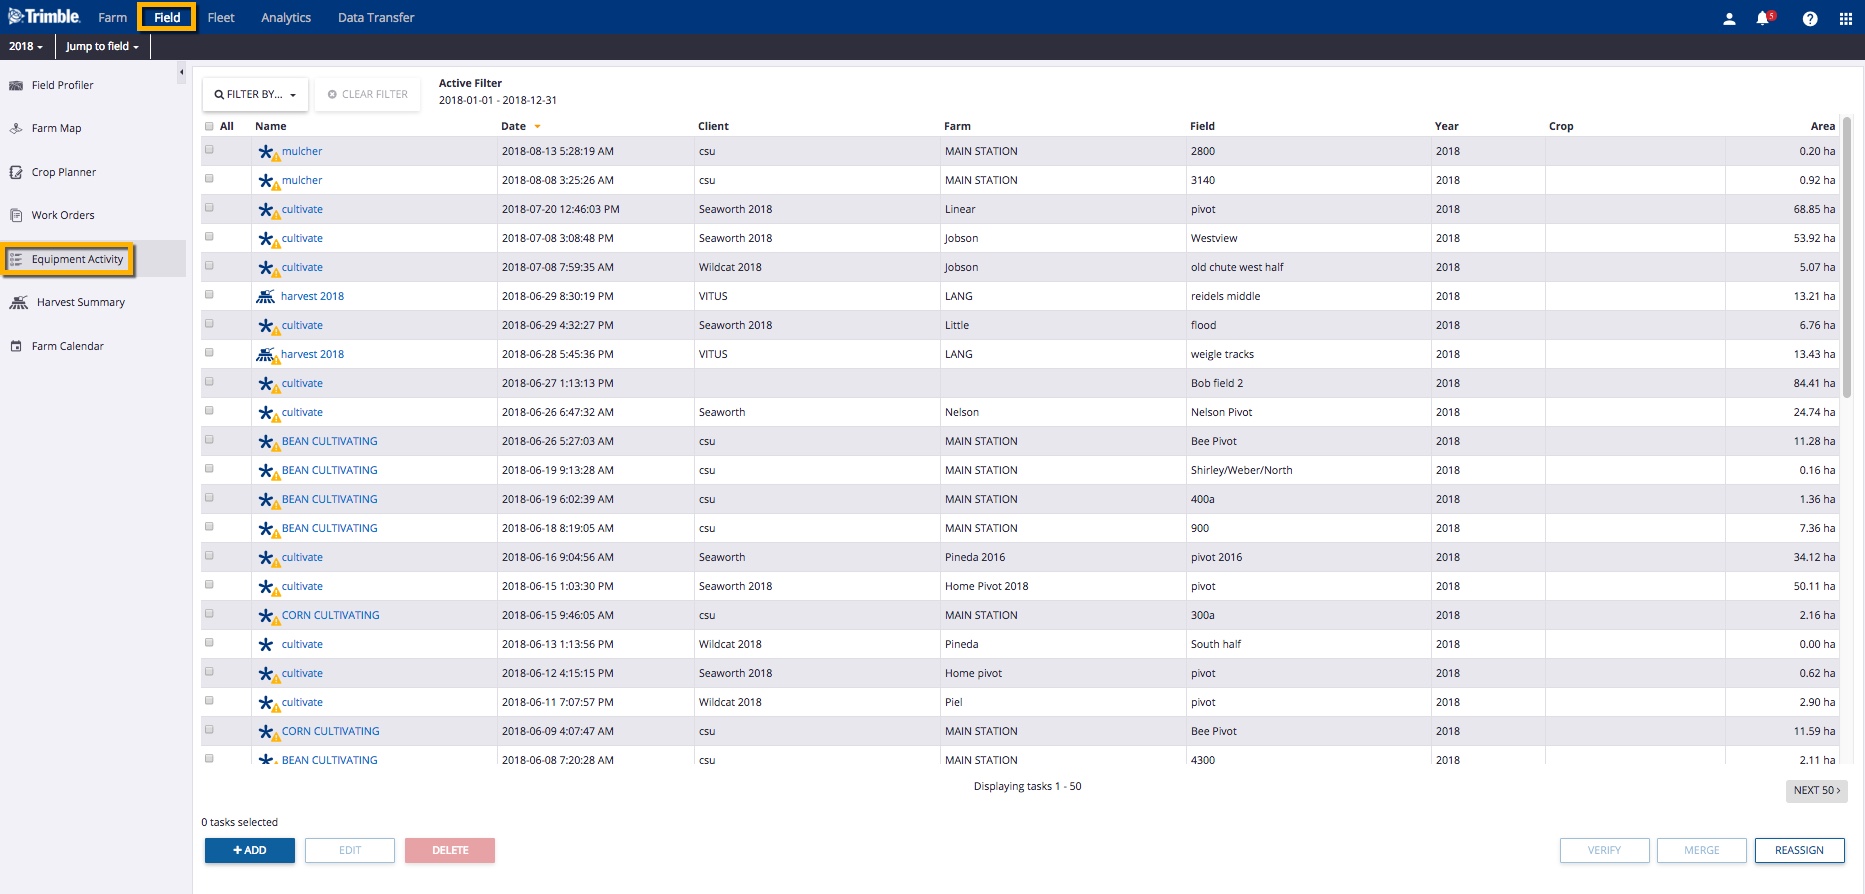
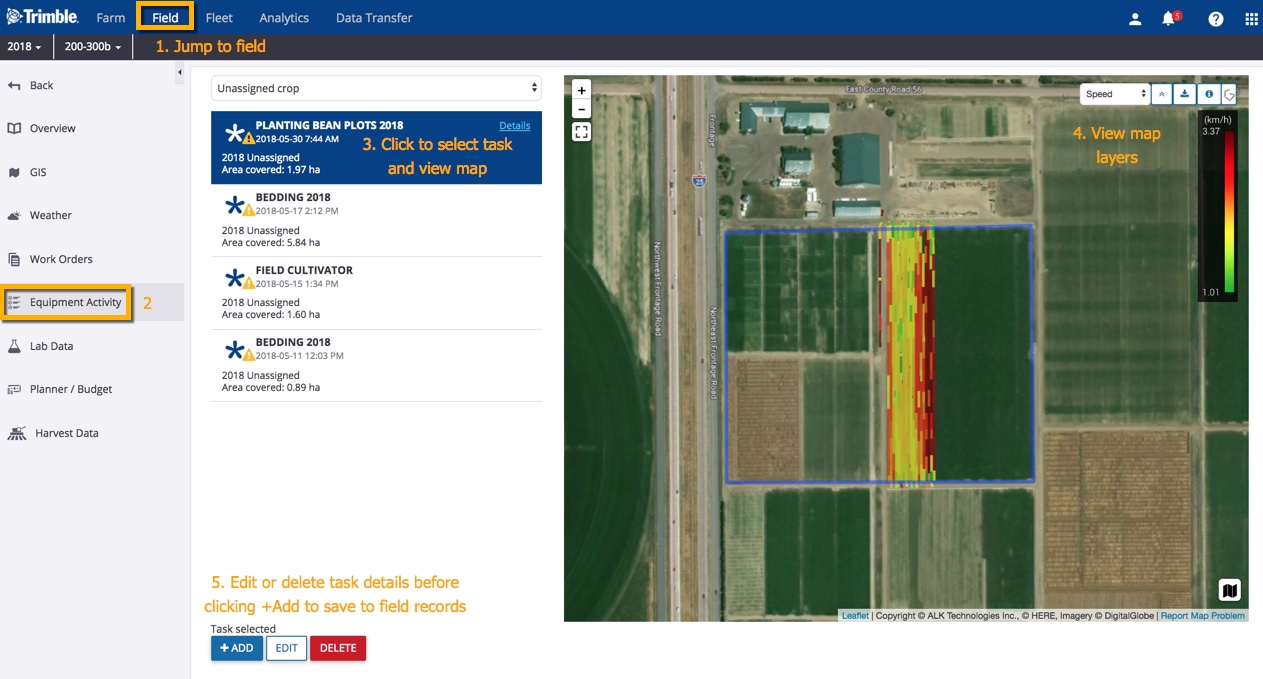
When equipment data is read-in to Trimble Ag Software through file imports or wireless connections with vehicle displays or third-party accounts, it’s held for verification before the data becomes part of a field record. You can edit or delete the task details to fix errors, merge or reassign tasks, and control whether to add tasks to maintain the accuracy of your field records and costs. Once you verify the task data, the information can be used in reports and coverage maps in the online account or on the mobile app.
Select Equipment Activity from the left menu navigation to display a summary of tasks for all fields
Note: tasks flagged with a warning icon will alert you to missing information (such as a crop or crop year) that is required before data can be added to your field records
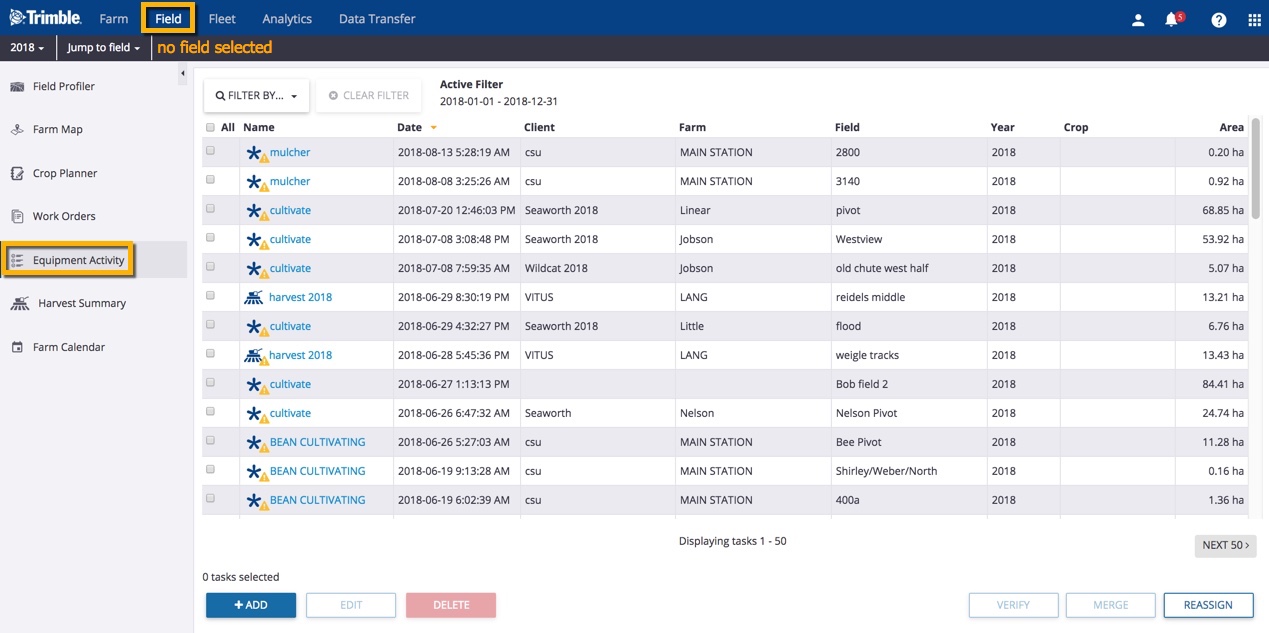
Adjust the table view by clicking:
Filter By to view information by Date, Client : Farm : Field, Crop, Operation, Vehicle, Implement, Operator, Material or Is Verified
Click X Clear Filter to show the default view
any column heading to sort table rows in ascending or descending order
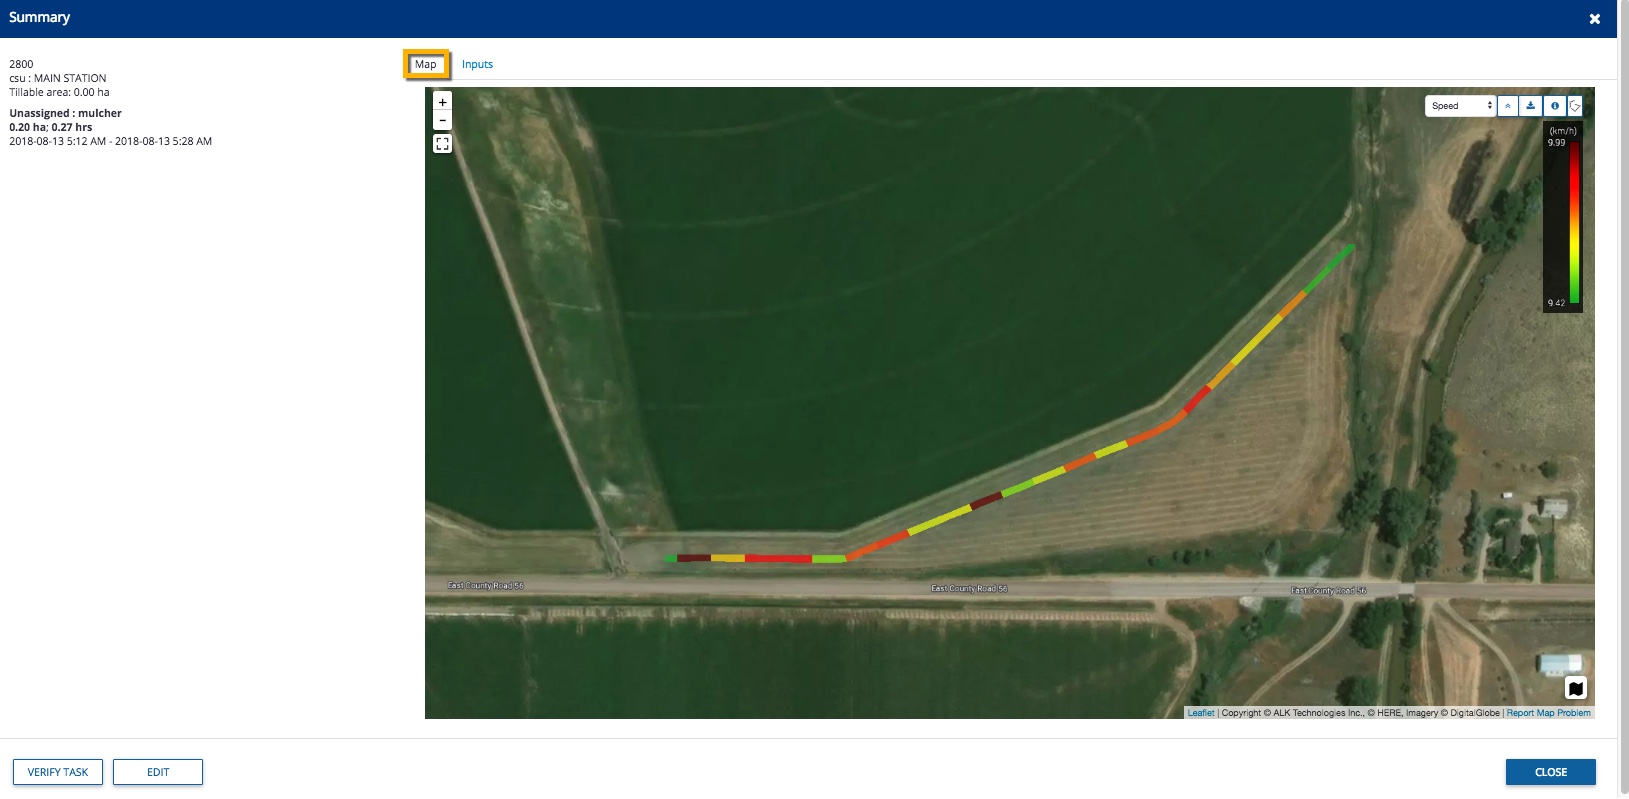
Click the task Name to display Summary details in a pop-up window, including:
Map tab with options to view different coverage maps (based on how the vehicle display was configured), change the base map type to Satellite or Roads, download KML or SHP files as well as edit boundary
From here, you can also click the buttons (bottom left) to Verify Task without changes, or Edit task details (tip: use the Edit option first if the task displays a warning icon that indicates missing information, only visible on the main list shown in step 4)
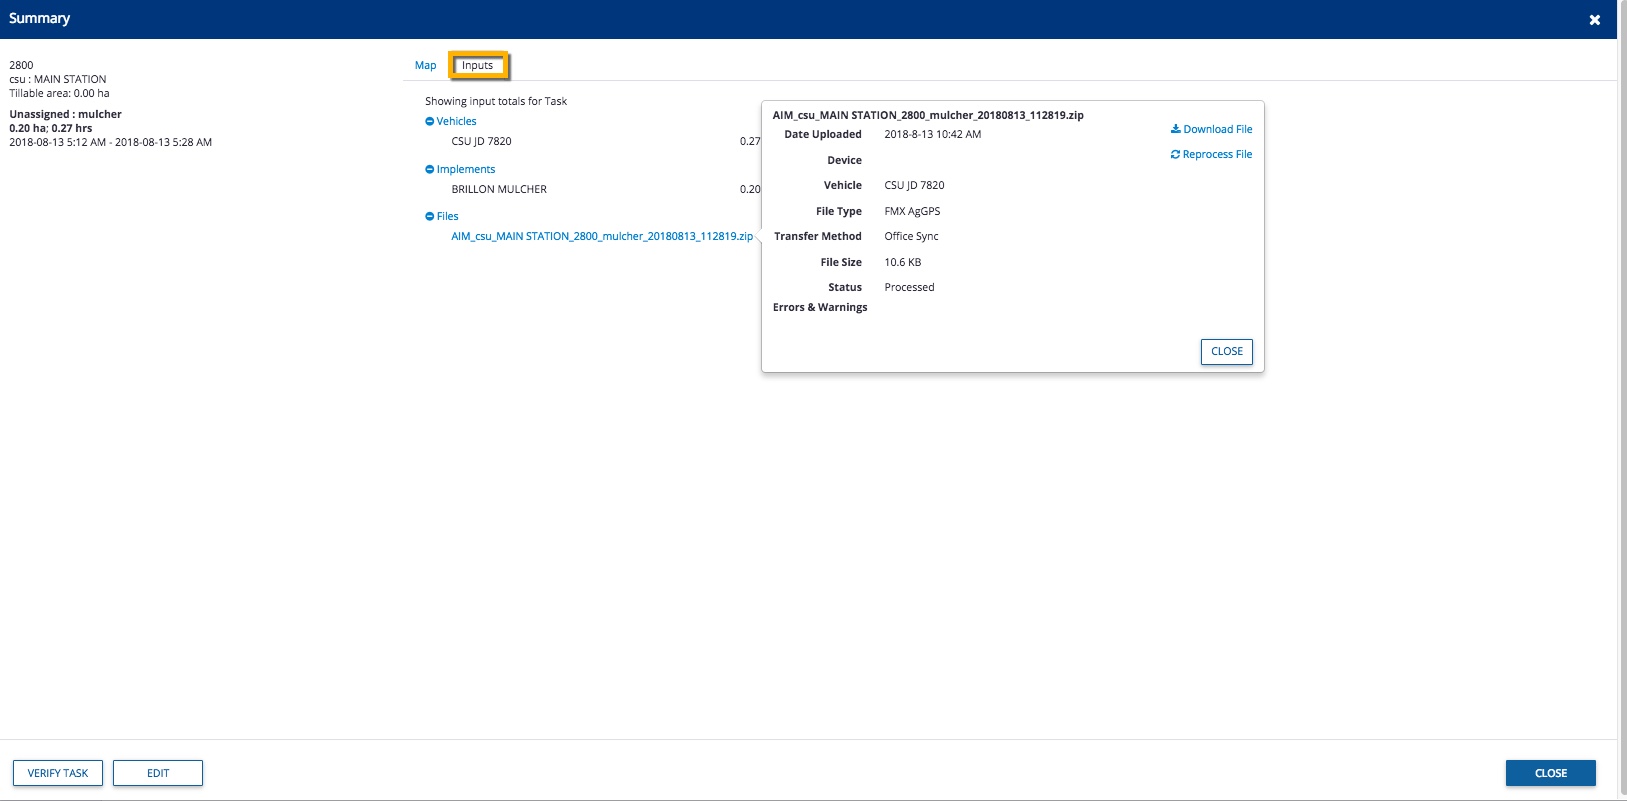
Inputs tab with details on any vehicles and implements used including duration and cost for the task, as well as a link to files from the display
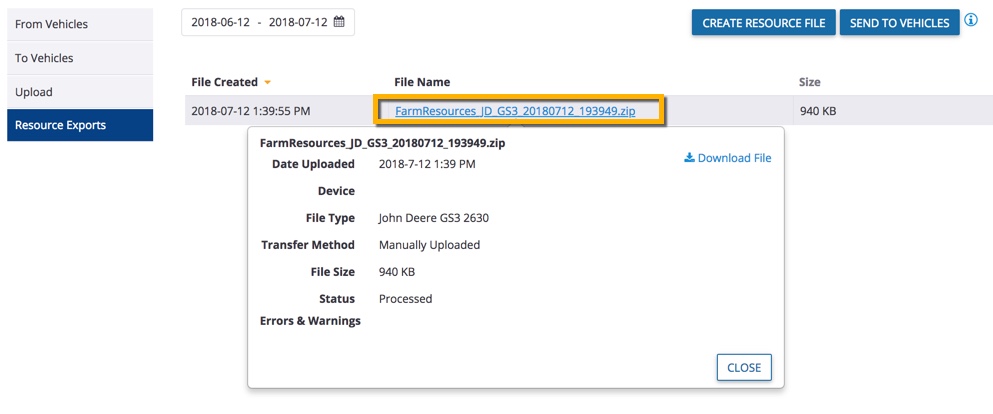
Click the file name to view more details, including the File Type, Transfer Method, File Size, Status and Errors & Warnings, with options to Download File or Reprocess File
Click the buttons (bottom left) to Verify Task without changes or Edit
From the main list (shown in step 4) you can also use buttons on the bottom of the screen to manage task data:
Verify – select one or more tasks to automatically add the data to field records without any changes
tip: use the Edit option first if the task displays a warning icon that indicates missing information
Merge – select two or more tasks associated with the same field to permanently merge data into one task (at the prompt, click Yes or No to continue, as this change cannot be undone)
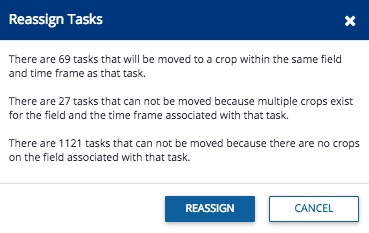
Reassign – select a task in order to move all other tasks with the same crop to the same field and time frame (crop year), as shown in the confirmation message example below (at the prompt, click Reassign or Cancel, or Edit related tasks to resolve mismatches before trying again)
+Add – create a new task by selecting a field and manually entering the task details
Delete – select one or more tasks to remove the data from the Equipment Activity list (at the prompt, click Delete or Cancel)
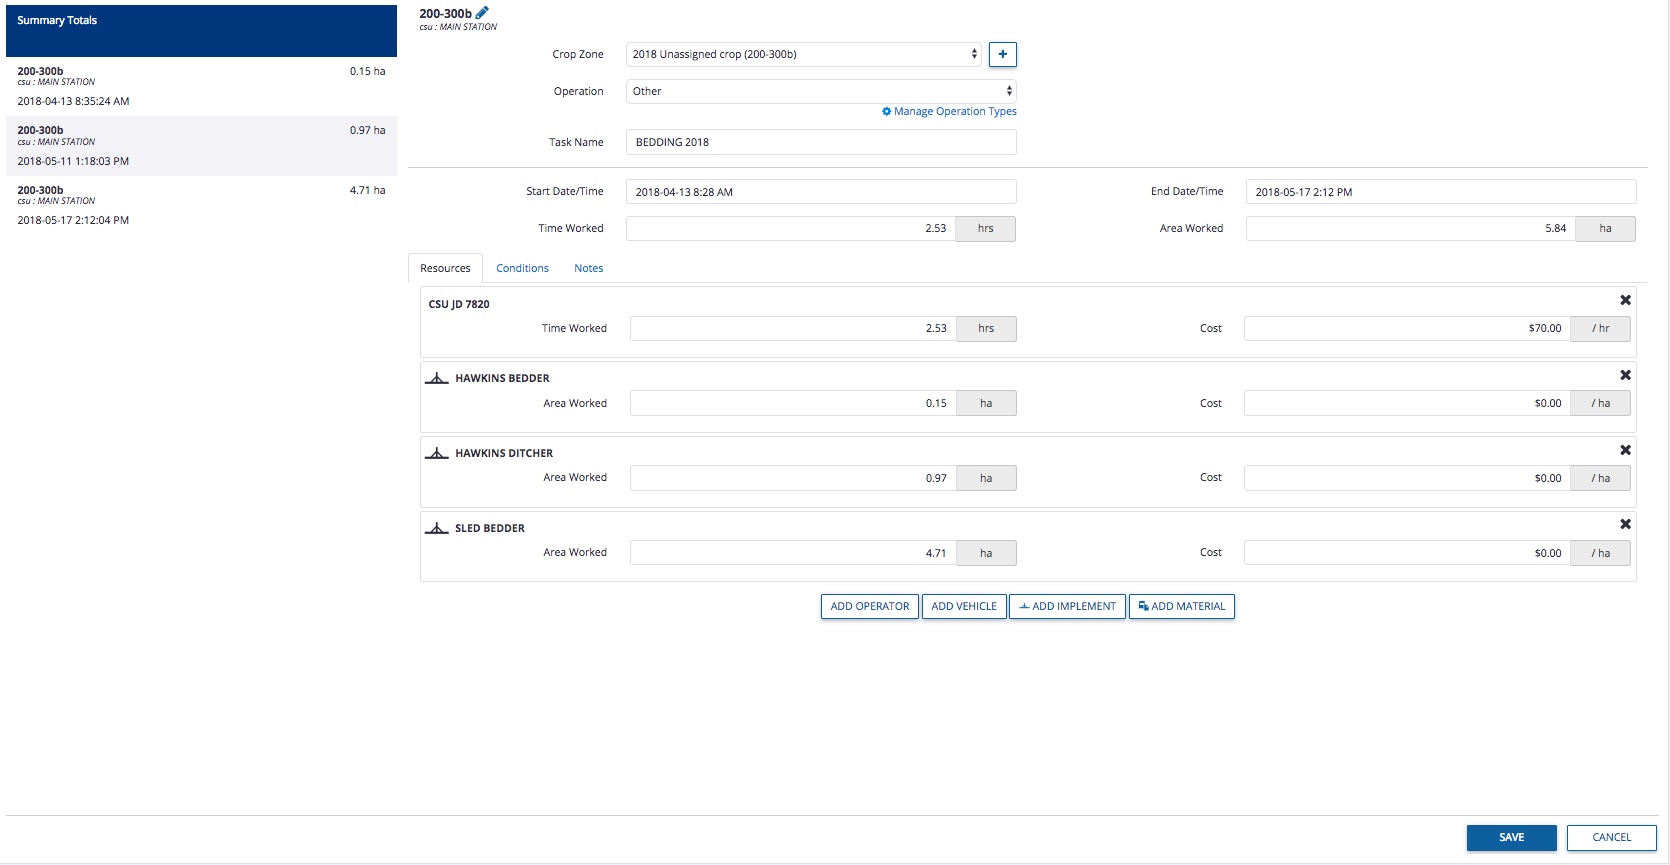
Edit – select a single task to review and change the task details, as shown below:
In the Summary information at the top of the screen, review and edit the following:
Field name (required) – click the pencil icon at the top of the screen
Crop Zone (required) – select from the list of crop years in the account, or click the plus icon to add a new crop year
Task name (required) – click to edit the text displayed
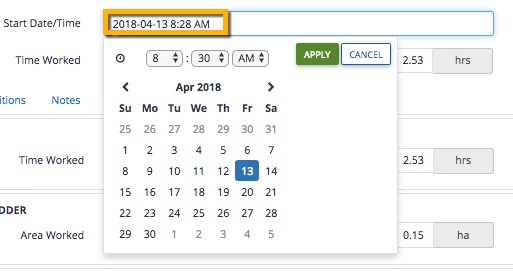
Start/End Date and Time (required) – click the date and time shown to display the calendar and clock options and change as needed, then click Apply to automatically update the total Time Worked
On the Resources tab, review and edit the following areas (as needed):
Time Worked, Area Worked and Cost – click to edit the text displayed for each vehicle, implement or operator
Add Operator – click the button to select a name from the list of operators in your account
Add Vehicle – click the button to select a name from the list of vehicles assigned to your account
Add Implement – click the button to select a name from the list of implements assigned to your account
Add Material – click the button to add a Chemical, Fertilizer, Lime, Mix, Seed or Water from the list of materials in your account
On the Conditions tab, add information to capture the following (as needed):
Weather – click to select the Date/Time Recorded and enter text to record Temperature, Humidity, Wind Speed, Wind Gust Speed, select Wind Direction and select Sky observations (note: units of measure shown will reflect your individual settings)
Field – click to select options for Soil Condition, Growth Stage and Application Method
On the Notes tab, enter any additional comments
Click Save (or Cancel)
That’s it! Return to the Equipment Activity screen any time to review or change task details. Click here for more ways to view and use vehicle data in your account.
Once your vehicle displays are connected to Trimble Ag Software by serial number or through an API that shares data with your third-party account, your information is automatically pulled into the online account from your fleet activities. Our software uses spatial selection to look for matches between your data and our software, starting with the field name. If field names are different, Trimble Ag Software looks for a similar field boundary to assign jobs to the matching field.
At the farm level:
View vehicle profiles on the online dashboard
View vehicle location and working status on the online dashboard
View vehicle tasks on the online dashboard
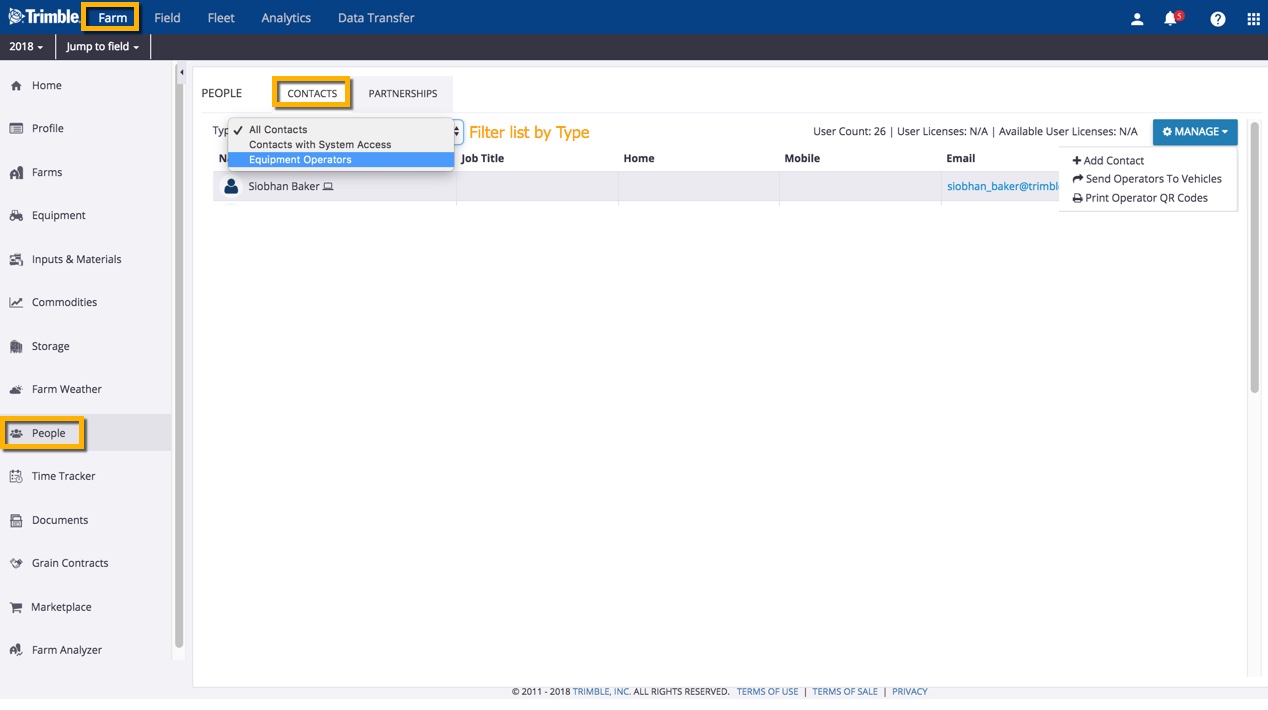
Assign operator access and send operators to vehicles on the farm
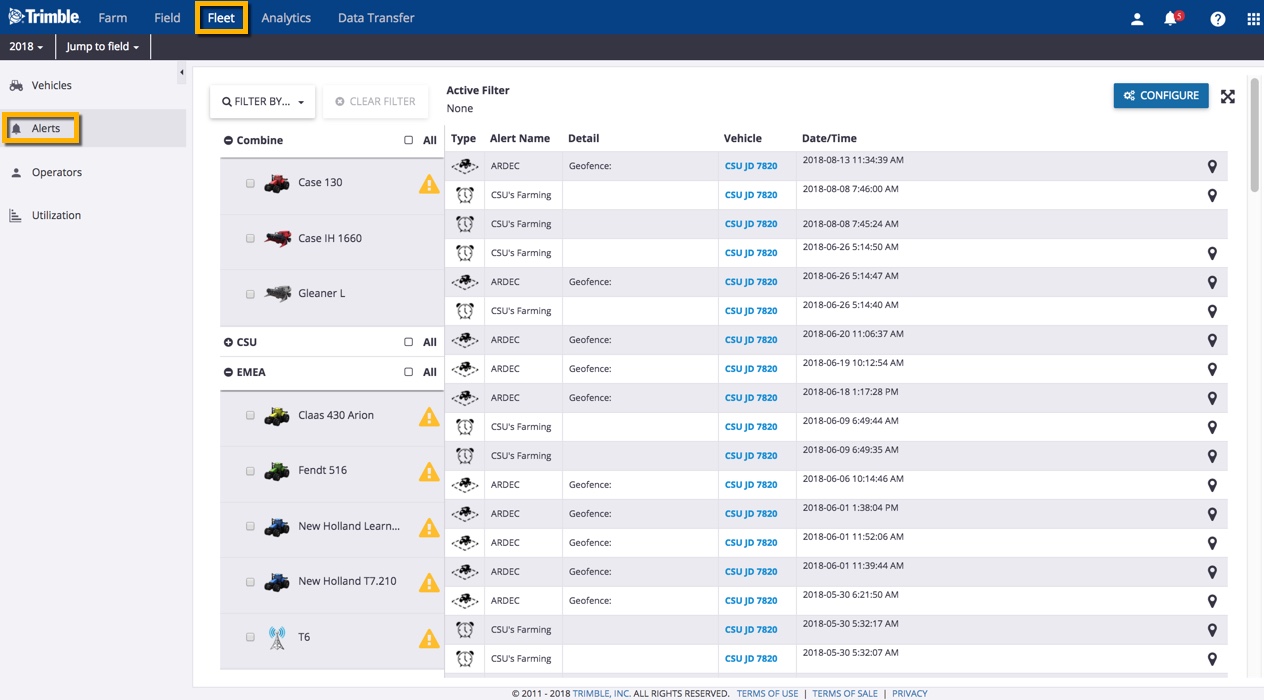
Manage alerts for curfew, geofence, machine alert, ignition and rushing
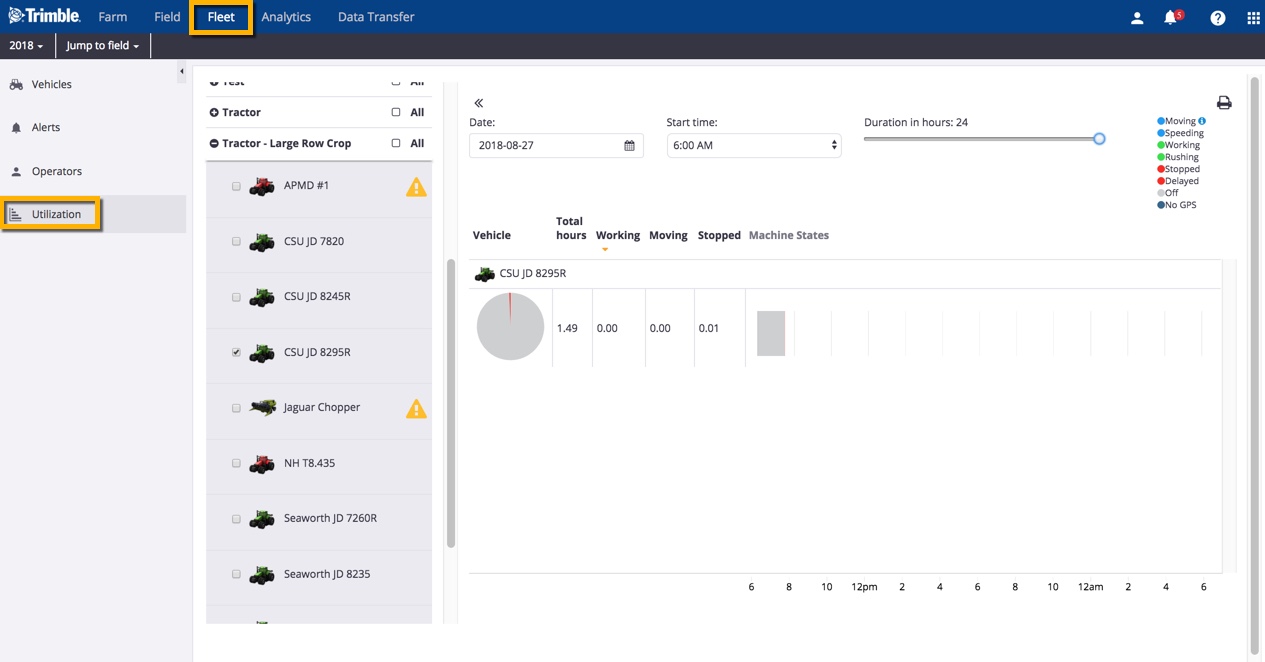
View fleet utilization levels by time period, status, and alerts
Click the information icon to see which formats and displays are supported
Choose from one of two options by clicking the buttons on the top right corner of the screen:
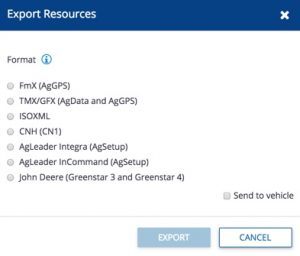
Create Resource File
Click to select a Format from the pop-up window to manually upload a zip file to your online account, with the option to select Send to Vehicle, then click Export (or Cancel)
Once the file is created, click the File Name link to view details or click Download File to save a copy to your computer or USB stick
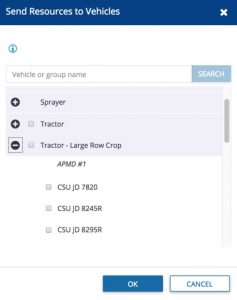
Send to Vehicles
Search or select one or more vehicles or groups from the list of compatible displays connected to your account via serial number or via third-party API connection with the John Deere Operations Center
Click OK to send the resource file to one or more vehicle displays (or Cancel)
Visit our Managing Fleet quick-start guide for more ways to use your vehicle data in Trimble Ag Software, including our data compatibility chart by display, file type and third-party accounts.
Once you’ve set up your vehicles and data connections on the online account, you can use the Trimble Ag Mobile app to view fleet working status, and find or navigate to vehicles with GPS coordinates and satellite map views. For best results, turn on location services in your mobile device’s privacy settings, and activate Farm Stream on your vehicle display.
Tap the green sync icon (top right) to sync your mobile app with the latest updates online
From the mobile app’s home screen, select the preferred crop year (top left) when viewing the farm map
Tap the Fleet tile
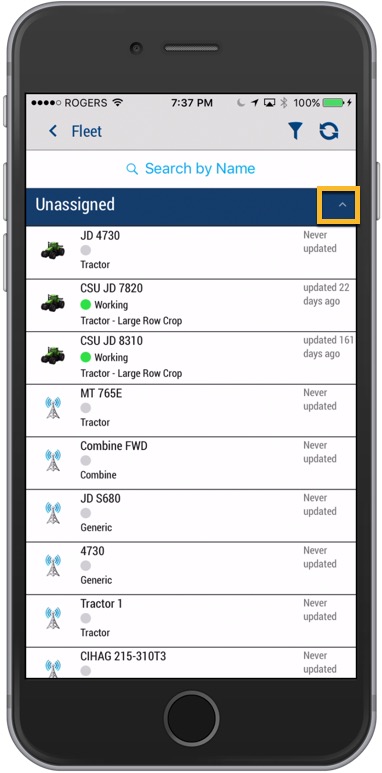
Tap on the dropdown arrow to expand the fleet list by vehicle group (default is Unassigned if you haven’t added a group to the online account)
Swipe up (as needed) to view the full list of vehicles by name, type, status (Working is shown in green) and last update (if no recent update, check the vehicle display to confirm Farm Stream is turned on)
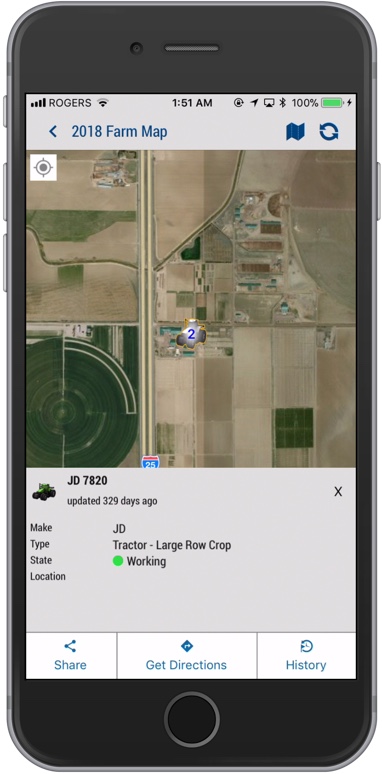
Tap to select a vehicle from the list, which displays a satellite map view of the vehicle location and working state details
Tap the compassicon to view your current location on the map (only use if you’re close to the vehicle location)
Tap the buttons on the bottom of the screen to select one of three options:
Share – send map coordinates to anyone
Tap to select a message app on your mobile device (such as email or text)
Add the recipient and any other details
Hit Send (or cancel the message by tapping the < back-arrow on the top left, then confirm Cancel or Discard at the prompt)
You may also need to close the app to return to Trimble Ag Mobile
Get Directions – navigate to the vehicle location
Tap the Directions button
Under the street view map, tap View Routing Apps
Tap Route to launch one of your mobile apps from the list (such as Google Maps)
Click Start to navigate to the location (or close the app to return to Trimble Ag Mobile)
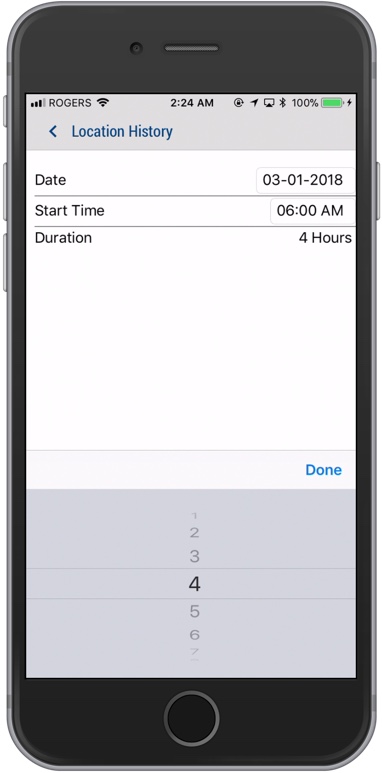
History – view location history by date and time
If no data, tap the pencil icon to view Location History
Tap to edit options for Date, Start Time and Duration (between 1 to 8 hours), then click Done
Tap the < back-arrow to return to the previous screen
Once you’ve set up your vehicles and data connections on the online account, you can use the Trimble Ag Mobile app to do more than find and navigate to your fleet. You can also track vehicles and operators at the same time when recording field-level tasks on the mobile app.
1. Log in to the Trimble Ag Mobile app on your mobile device (learn more)
2. Click the year (top left) to select the preferred crop year
3. Click on the Fields tile
4. Select a field from the list (sorted by Farm)
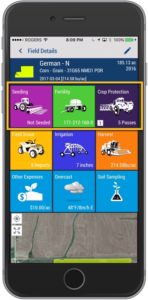
5. From the Field home screen, click on a tile for Seeding, Fertility or Crop Protection
6. Click an item on the list to edit an existing field application record, or click the + icon (top right) to add a new record
7. From the multi-tasker menu bar under the field name, click the vehicle icon
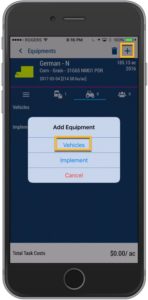
8. Click the + icon (top right) to add equipment (vehicles or implement)
9. Click Vehicles
10. Check the box to select vehicle(s) from the list, used for this field application event
11. Click the disc icon (top right) to save your selection
12. Click on the back arrow (top left) to return to the previous screen
13. At the prompt, confirm your changes by clicking Save
Note: vehicle usage tracked with field tasks and associated hourly costs are recorded on the mobile app only and are not visible in the Field Manager or Analytics reports available in the online account.
While your local Trimble Authorized Reseller can provide you with robust, fully supported solutions for wireless data transfer powered by higher-end modems such as the DCM-300® or GX450® , there are lower-end solutions for those of us willing to put in a little extra effort. Keep in mind that this is not an officially supported configuration, but with a little work, you can connect a few very specific off-the-shelf components to allow your Trimble FmX® display to leverage a simple wireless hotspot from your smartphone.
Components:
USB to Ethernet – The success of this configuration is made possible by one a very specific USB-to-ethernet adapter: the TRENDnet USB 2.0 to 10/100 Ethernet Adapter with the TU2-ET100 Chipset (buy on Amazon). This will Connect to the USB port on your FmX, and you can connect the ethernet side to almost any other source of connectivity.
Ethernet to WiFi – While we have generally used the IOGEAR Universal Ethernet to Wi-Fi N Adapter (buy on Amazon) due to it’s very low price point, theoretically any ethernet-to-network adapter should work, as long as it appears to be source of access to the ethernet cable.
WiFi Hotspot – Lastly, turning on the WiFi hotspot feature on your smartphone (many carriers will charge extra for this functionality) will provide the final connection to the internet, so you can send and receive files. For less than $40 USD in parts, there is little to lose if you want to give it a try.
Getting set up:
Purchase the components listed above
Purchase a Trimble Ag Software Plan and Display Connections (formerly Vehicle Connections) license (each display will take a display connection and additional Display Connections can be purchased beyond the included plan)
Set up a vehicle and assign the Device, and a Vehicle Connection to the Vehicle under Farm > Equipment > Vehicles
Connect the TrendNet USB to Ethernet adapter to the back of your FmX
Connect the Ethernet to your IOGEAR Ethernet to Wi-Fi N Adapter
Note: you will have to follow the instructions provided with your adapter to connect it to your preferred WiFi hotspot ahead of time (this step is usually done using a computer or WPS)
From your FmX display, turn on wireless data transfer by adding the Office Sync module in the Settings (the password to access the settings is 2009)
That’s it! Now you have wireless data transfer whenever you’re in range of Wi-Fi coverage.
Need help? While this is not an officially supported hardware configuration, please contact our customer support team if you have any questions or issues with configuring Trimble Ag Software or your FmX. Every annual Trimble Ag Software Plan comes with access to our support network to help farmers.